Creating the perfect smokey eye can transform your look from ordinary to extraordinary in just a few steps. This iconic makeup style is not only versatile but also enhances your features, making it a favorite for both everyday wear and special occasions. Whether you’re a makeup novice or a seasoned pro, mastering this technique empowers you to express your personal style confidently.
You may find yourself overwhelmed by the myths surrounding the smokey eye, but fear not! In this guide, we’ll break down this dramatic look into seven easy-to-follow steps, demystifying the process and making it accessible for everyone. Get ready to elevate your makeup game: by the end of this tutorial, you’ll be equipped to create a sultry smokey eye that highlights your unique beauty, leaving you eager to showcase your skills. So, let’s dive in and unleash your inner makeup artist!
Choosing the Right Products for a Smokey Eye Look

Creating the perfect smokey eye look starts with selecting the right products that suit your style and desired effect. A successful smokey eye requires a seamless blend of colors and textures, which means choosing quality eyeshadows, eyeliners, and tools is essential. Begin with a trio of eyeshadows: a base shade in a mid-tone, a darker shade for depth, and a light shade for highlighting. Brands like Seint and Thrive offer versatile palettes that incorporate neutral tones, making it easy to achieve that coveted balance.
When it comes to eyeshadow finishes, the choice between matte and shimmer can dramatically affect the outcome. Matte shadows provide a smooth base and are excellent for layering, while shimmery shadows add dimension and can brighten your look. Consider the look you aim to accomplish; for a classic smokey eye, a matte darker shade adds sophistication, while shimmer can enhance the drama.
Investing in high-quality tools is equally important. Use a flat brush for applying eyeshadow to the lid, a blending brush to softly diffuse colors, and a smaller angled brush for precise application around the lower lash line. For liner, a creamy pencil or gel liner will glide on effortlessly and blend with eyeshadow to create that smoky effect. Brands like Ilia and ELF provide great options at various price points.
Additionally, always keep in mind your skin type when selecting products. If you have sensitive skin or eyes, opt for hypoallergenic formulations to avoid irritation. Ultimately, feel empowered to experiment with different products until you discover what best enhances your unique beauty while achieving that striking smokey eye effect.
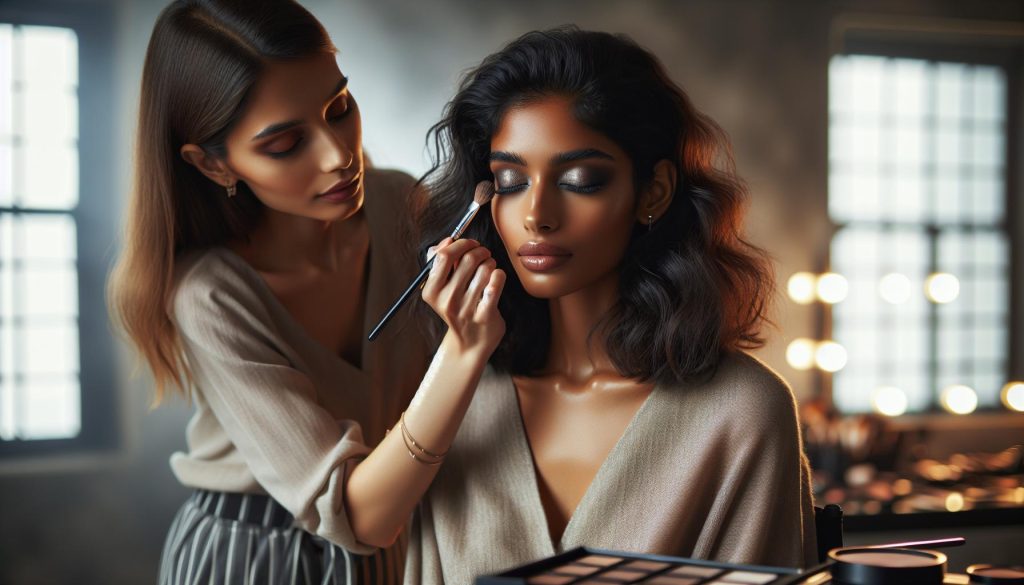
Step-by-Step Guide to Create the Perfect Smokey Eye
Creating a show-stopping smokey eye look is simpler than you might think, and it can elevate any makeup routine with an air of sophistication and drama. By breaking down the process into easy-to-follow steps, you can achieve that bold and sultry effect that enhances your natural beauty. Here’s how to master the art of the smokey eye, step by step.
Start with a clean, well-prepped eyelid. Apply an eyeshadow primer to create a smooth base that will help your makeup last longer. Once set, begin with a neutral base shade on your lid to even out the skin tone. This also acts as a helpful backdrop for the darker shades you’ll apply next. For this, a soft, flesh-toned eyeshadow often works wonders.
Next, transition into your deeper shades. Using a small, dense brush, apply a dark eyeshadow to the outer corner of your eyelid in a sweeping motion, gradually building the intensity. A classic choice is a matte black or deep brown for that quintessential smokey effect. Blend the edges using a clean blending brush to soften the look, ensuring there are no harsh lines. As you blend, bring the dark color slightly into the crease – this adds depth and creates that desired smoky gradient.
Add Dimension
To create a more dimensional look, choose a mid-tone shade to apply to your crease. This acts as a transition between your base shade and the darker outer corner. Blend well so that each color merges seamlessly. Highlight your brow bone and the inner corners of your eyes with a lighter shadow or highlighter to draw attention to your eyes and brighten your overall look.
For that definitive smokey eye finish, don’t forget to incorporate eyeliner. Apply a black or dark eyeliner along your upper lash line, smudging it slightly for a softer, smoky effect. You can also run the same liner along your lower lash line for continuity. Finally, complete the look with mascara to give your lashes volume and length. Opt for a few coats to ensure your eyes pop and contrast beautifully against the dark shadows.
Remember, practice makes perfect, and don’t hesitate to customize these steps. Whether you choose to incorporate colors or textures like shimmer, the essence of the smokey eye lies in blending and balance. With these easy steps, you’re well on your way to creating a stunning, eye-catching look that dazzles from every angle.
Tips for Different Eye Shapes and Sizes

When it comes to achieving the perfect smokey eye, understanding your eye shape and size can make a world of difference. Each eye shape brings its unique beauty and opportunities for creativity, and tailored techniques can enhance these features, ensuring that the smokey look perfectly complements your natural allure. Here are some essential tips designed for various eye shapes, helping you to master the smokey eye technique, no matter your starting point.
For hooded eyes, the key is to create dimension that stands out. Start by using a transition shade in your crease and slightly above it; this will help to visually lift the eye. When applying darker shadows, focus on the outer corners and blend well into the crease without letting the color extend too far up, as this can be lost under the hood. A well-defined eyeliner along the lash line helps to enhance the shape, making the eyes appear more open.
Almond-shaped eyes have a great balance and symmetry, making them versatile for smokey looks. You can go dramatic by extending your darker shadows outward towards the temples to create a winged effect. This shape also allows for experimentation with color and the layering of textures. For further enhancement, consider applying a hint of a lighter shade to the inner corners to brighten and widen the appearance.
If you have round eyes, aim to elongate their shape by keeping the darker colors concentrated at the outer corners. Start at the outer third of the lid and blend inward towards the middle. This technique provides a more elongated appearance, drawing focus outwards. A tapered eyeliner flick will also enhance this effect, drawing the eye and making it look more elongated rather than round.
For deep-set eyes, the goal is to add light and highlight to the areas that might appear shadowed. Begin with a lighter base shade all over the lid, complementing it with medium shades along the crease. Avoid overly dark colors on the lid, instead saving them for the outer V to add depth without overwhelming the natural contours of your eye. A touch of shimmery highlight on the brow bone enhances the eye’s contour, ensuring it doesn’t lose dimension under darker shades.
Understanding how to adjust your smokey eye technique to fit the unique contours of your eye shape not only refines your makeup skills but also boosts your confidence in executing a look that highlights your best features. Embrace these tips, experiment with varying colors and textures, and soon you’ll find the perfect smokey eye that is uniquely you.
Common Mistakes to Avoid When Applying Smokey Eye Makeup

Creating a striking smokey eye can be a transformative beauty look, elevating your makeup game to new heights. Yet, even seasoned makeup enthusiasts can fall prey to common pitfalls that hinder the desired effect. Identifying and avoiding these mistakes can be the difference between a stunning smokey look and a muddled appearance that detracts from your beauty.
One of the most prevalent issues is neglecting to start with a proper base. Applying a cream shadow or a primer designed for the eyelids helps create a smooth canvas and enhances the vibrancy of the powders applied on top. Not using a base can lead to uneven application and color fading throughout the day. Additionally, layering too much dark shadow too quickly can create a muddy effect; instead, build intensity gradually by layering lighter shades first, then adding darker tones with finesse.
Blending techniques also play a crucial role in achieving a seamless smokey eye. The mistake of harsh lines or abrupt transitions can make the look appear more chaotic than chic. To avoid this, use a clean blending brush to soften edges and ensure smooth gradients between colors. Remember to blend upwards towards the brow bone rather than downwards; this approach will help maintain the shape of your eyelid and prevent looking overly heavy.
Lastly, many overlook the importance of finishing touches. Eyeliner and mascara are not just afterthoughts; they can either enhance or detract from the smokey effect. A common misstep is applying a heavy line of eyeliner that competes with the shadow rather than complements it. Instead, opt for a softer application, perhaps using a pencil or gel liner that can be smudged into the shadow for that desired blend. When it comes to mascara, avoid clumping; instead, focus on separating and elongating lashes to frame your eyes beautifully.
By being mindful of these common mistakes-starting with a proper base, blending effectively, and paying attention to your eyeliner and mascara techniques-you can confidently create a flawless smokey eye that turns heads and showcases your makeup artistry.
Enhancing Your Smokey Eye with Eyeliner and Mascara
There’s something undeniably captivating about the interplay between eyeliner and mascara when enhancing a smokey eye. These two elements are not merely finishing touches; they are essential components that add depth and dimension, helping to frame the eyes and complete the look. Mastering their application can elevate your smokey eye from merely acceptable to truly show-stopping.
To begin, when it comes to eyeliner, the key is in the application technique. A striking smokey eye often benefits from a softer eyeliner approach, particularly if you’re aiming for a more blended and seamless look. Rather than opting for a harsh line, choose a gel or pencil eyeliner that can easily be smudged. Start by applying the liner along the upper lash line and lower waterline. Once applied, use a small smudging brush or a fingertip to gently blur the edges, which will help create that desired smoky effect. This soft blending not only enhances the depth of your eye makeup but also ties all the elements together beautifully.
Choosing the Right Mascara
Equally important is the mascara, which serves to define and awaken the eyes after the smoky shadow has done its job. For the best results, look for a volumizing formula that not only thickens but also lengthens your lashes. Start by applying a base coat to separate the lashes, using a combing action with the brush. This will prevent clumping, ensuring that each lash is distinct. Once the first layer is dry, go in for a second coat, focusing on the tips of the lashes to create a dramatic lift. Don’t shy away from applying mascara to your lower lashes as well, as it helps balance the overall look, drawing attention to your beautifully defined eye area.
Utilizing both eyeliner and mascara effectively changes the game’s dynamics, allowing the captivating allure of a smokey eye to shine through. A well-executed application can transform your makeup, highlighting your eyes elegantly and ensuring you make a formidable impression in any setting. Experiment with different liners and mascaras to discover what works best for your unique eye shape and preferences-there’s no one-size-fits-all when it comes to beauty!
How to Transition Your Smokey Eye from Day to Night
Transforming a smoky eye from a subtle day look to a bold evening statement is easier than you might think. The secret lies in layering and strategic adjustments that amplify your eye makeup while maintaining harmony with your overall look. Whether you’re heading straight from the office to an event or simply want to add some drama, here’s how to elevate your smoky eye effortlessly.
Start with the base you’ve already created for your day look. This often involves neutral tones applied lightly. To shift into evening mode, enhance your smoky eye by adding deeper shades. Use a darker hue of the same color family you started with-this will maintain consistency while intensifying the effect. Focus on the outer corners of the eyes and the crease, blending well to avoid harsh lines. A great technique is to apply the darker shadow using a small, fluffy brush and then blend it outwards with a clean blending brush, ensuring a seamless transition.
Highlight and Define
Next, bring some brightness back into your eye look to counterbalance the darker shadows. Apply a shimmery highlighter to the inner corners of your eyes and just beneath the brow bone; this not only lifts the eye area but also adds an element of fresh light that can enhance the drama of your smoky eye. Don’t shy away from adding additional eyeliner for a more defined look; a thicker line along your upper lash line can create that bold effect. Consider using a gel or liquid eyeliner for precision, and smudge it slightly if you want to retain some of that signature smoky effect.
Finishing Touches with Mascara
Finally, your mascara will play a crucial role in this transition. Amplify your daytime mascara by applying an additional coat, concentrating on the tips of your lashes for extra volume and length. For nighttime, consider using a volumizing or dramatic mascara that captures attention. Applying mascara to your lower lashes can also add depth to the overall look and balance nicely with the deepened shadow.
By following these steps, you elevate your smoky eye into an irresistible look fit for night adventures-all without starting from scratch. The key is in the layering and the ability to adapt your existing makeup to suit different settings. Enjoy experimenting with your smoky eye and discovering how to make it uniquely yours!
Expert Techniques for Long-Lasting Smokey Eye Makeup
Creating a smoky eye that lasts all day or night requires more than just the right techniques; it also involves strategic product choices and a few professional tips. The secret to ensuring your smoky eye makeup stays flawless lies in preparing your eyelids, selecting high-quality products, and utilizing long-wear application methods. This will not only enhance the intensity of your look but also maintain its beautiful blend for hours, preventing any unsightly creasing or fading.
Start with an eye primer, as this is your foundation for a long-lasting smoky eye. A good primer not only creates a smooth canvas but also helps adhere the eyeshadow, preventing it from fading or settling into fine lines. After priming, consider using a cream eyeshadow as a base layer. Cream shadows typically provide better staying power compared to powders and increase the vibrancy of the color you apply on top. Choose a shade that complements your smoky eye-neutral or darker tones enhance the depth of your colors.
When applying your eyeshadow, use a patting motion instead of sweeping to apply pigments. This method allows for better color payoff and adhesion. Build the color gradually, starting from lighter to darker shades. Opt for high-quality pigmented shadows that are designed for long wear. For extra durability, finish your smoky eye with a setting spray once all products are applied; this can lock in your look for an extended period.
To enhance longevity, consider using waterproof and smudge-proof products. Eyeliners and mascaras specifically labeled for long wear will help prevent any raccoon-eye moments throughout your day or night. When sharing this look with clients, especially for special events, stresses the importance of touch-up products like a compact mirror and blotting papers to maintain freshness without adding weight to the makeup.
With these expert techniques, your smoky eye can be a striking component of your overall makeup look, remaining vibrant and intact from morning coffee to after-dinner drinks. Experiment with these strategies and watch your confidence soar as you master the art of longer-lasting eye makeup.
Accessorizing Your Smokey Eye with the Right Lip Color
Complementing a dramatic smoky eye with the right lip color can elevate your look from understated to show-stopping. The key is to find a balance between the boldness of your eye makeup and the sophistication of your lip choice. As a general rule, if your eyes are the star of the show, keeping your lips more muted can help to maintain harmony and elegance in your makeup look.
For those who love a classic combination, nude lipsticks are a timeless choice that pairs beautifully with smoky eyes. Shades like peachy nudes or soft pinks provide a subtle contrast, allowing your eyes to take center stage without overwhelming your features. Alternatively, if you’re feeling a bit bolder and want to create a striking juxtaposition, a rich berry or deep red lip can create a dramatic effect that’s perfect for evening events. Just ensure that the lip color you choose complements the tones in your eye makeup-think about the undertones and richness to create a cohesive look.
Choosing the Right Finish
The finish of your lip product can also make a significant difference. Glossy finishes can add a youthful sheen that pairs well with a more matte smoky eye, while matte lipsticks offer a sophisticated vibe that aligns beautifully with a rich and smoky eye. If you opt for a glossy lip, consider a clear gloss over a tinted base to keep it chic and sleek. Conversely, if you choose a matte finish, layering a moisturizing balm underneath can provide comfort without compromising the look.
Practical Tips for Application
When applying your lip color, use a lip liner to define your lips, which can help prevent feathering and give a clean finish. This is particularly important when sporting a bold color. For a perfectly polished look, start by filling in your lips with the liner before applying lipstick-this technique enhances longevity and pigment.
In the world of beauty, confidence is the ultimate accessory. So whether you stick with a delicate nude or go all out with a bold red, remember that it’s about celebrating your uniqueness and embracing your personal style. The combination of a well-executed smoky eye and the right lip color can make you feel empowered and gorgeous.
Matte vs. Shimmer: Choosing the Right Eyeshadow Finish
Selecting the right finish for your eyeshadow can drastically influence the overall impact of your smokey eye look. The choice between matte and shimmer is not merely a matter of preference; it can elevate your makeup game, enhance your eye shape, and compliment your skin tone, allowing for endless creativity in your beauty routine.
Matte Eyeshadow: This finish is ideal for creating depth and dimension. Matte shadows provide a smooth application and are excellent for blending, making them perfect for the transition shades in your smokey eye. Their velvety texture allows for controlled layering, which is particularly beneficial for beginners who might feel overwhelmed with glitter or shimmer. When applied at the crease or along the lower lash line, matte shades can create a sophisticated, understated look. For those with textured skin or mature eyelids, matte shadows can be less likely to emphasize fine lines, offering a smooth canvas without added shimmer.
Shimmer Eyeshadow: On the other hand, shimmer eyeshadows can add a dazzling twist to your smokey eye. These shadows catch the light, providing a stunning contrast against darker hues, and create a mesmerizing effect that enhances dimensionality. Applying shimmer on the lids can make your eyes pop, particularly in nighttime settings or events where you want to draw attention. A common technique is to use a shimmering hue in the center of the eyelid to create a spotlight effect, while keeping the outer edges darker for balance. However, for those concerned about shimmer settling into fine lines, it’s advisable to use cream formulas or finely milled powders that apply smoothly without clumping.
Considerations When Choosing a Finish
Your eye shape and personal style should guide the choice between matte and shimmer. For example, hooded eyes may benefit from matte finishes that won’t overpower the lid space, while almond-shaped eyes could play with both finishes for a bold, artistic look. Experimenting with dual-finish applications-like pairing a matte crease with a shimmer lid-can create a stunning effect that balances sophistication with flair.
Additionally, consider the occasion. A matte eye can be perfect for office wear or daytime outings, while a shimmer finish excels in evening settings or special occasions, adding that extra touch of glamour. In essence, the choice of matte or shimmer should align with both the desired intensity of your look and the atmosphere you aim to create, empowering you to express your unique style with confidence.
Maintaining Eye Health with Makeup Removal Tips
To keep your eyes healthy and maintain a radiant look after a stunning smokey eye, proper makeup removal is essential. Many people overlook this vital step, but it plays a significant role in preventing irritation, breakouts, and other skin issues. Consider adopting a gentle yet effective makeup removal routine that aligns with the boldness of your look.
Start with a high-quality makeup remover specifically designed for waterproof formulas if you’ve used long-wear products. Look for oil-based removers or micellar waters, as they efficiently dissolve heavy pigments without much friction. After applying the makeup remover to a cotton pad, hold it against your eyelid for a few seconds before gently swiping away the makeup. This method minimizes tugging on the delicate skin around your eyes. Always remember to go easy, as the skin around the eyes is particularly sensitive and prone to damage.
Once the majority of the makeup is gone, follow up with a gentle cleanser to ensure all residue is removed. Choose a gentle, hydrating facial cleanser that won’t strip your skin of moisture. After cleansing, consider applying a soothing eye cream or serum enriched with antioxidants and hydrating elements to nourish and protect your skin after exposure to heavy makeup.
Be mindful of your eye health by avoiding sleeping with makeup on, as this can lead to serious eye irritation and infections. Regularly cleanse your brushes and tools to prevent bacterial buildup, which can compromise both the health of your skin and the efficacy of your smokey eye look. Ensuring you have a safe and effective makeup removal process will keep your eyes looking vibrant and fresh, allowing you to confidently rock that smokey eye time and again.
Incorporating Trends: Modern Takes on the Smokey Eye
Modern interpretations of the classic smokey eye are constantly evolving, allowing makeup enthusiasts to express their creativity while maintaining a timeless allure. Whether experimenting with unexpected colors, incorporating graphic elements, or blending different textures, contemporary takes on the smokey eye are as versatile as they are captivating.
One trend is the use of vibrant colors to replace the traditional blacks and greys. Deep jewel tones-such as emerald green, sapphire blue, and ruby red-offer a bold alternative while still providing that signature depth. To create this look, start with a neutral base and gradually layer your chosen color, blending it outwards for a soft gradient effect. This method not only enhances the eye shape but also adds dimension.
Another modern twist involves the incorporation of metallics or glitter, adding an eye-catching sparkle that elevates the classic look. Using shimmery eyeshadows or liquid eyeliners can transform a day look into something more glamorous for the evening. Apply a metallic shade to the inner corner of the eye and along the lower lash line to draw attention to your eyes, amplifying that smokey vibe while giving you a contemporary edge.
Graphic Liners and Unconventional Shapes
A particularly creative direction seen recently is the use of graphic liners accompanied by the smokey eye. This involves bold, defined lines that contrast with the softness of the smudged eyeshadow. Try drawing a wing that extends beyond the outer corner of the eye or creating geometric shapes that frame the eye. This approach adds a chic, avant-garde finish that’s perfect for nights out or fashion-forward events.
Making the Transition
To ensure these trends work seamlessly for any occasion, consider transitioning your smokey eye from day to night. During the day, opt for a lighter application with subtle hues, focusing on blending and soft edges. As evening approaches, darken the crease and outer corner while intensifying the eyeliner for that dramatic effect.
Incorporating these modern twists into your smokey eye routine not only showcases your personal style but also keeps your makeup game fresh and exciting. Embrace these trends, mix and match techniques, and let your creativity shine.
Expert Recommendations for Smokey Eye Tools and Brushes
Achieving the perfect smokey eye isn’t just about the skill of application; it heavily relies on the right tools and brushes to help execute your vision. Each tool serves a specific purpose, making it essential to understand which ones will enhance your technique and result in a stunning final look.
For blending, a fluffy blending brush is vital. This brush helps to seamlessly combine eyeshadow shades for that signature gradient effect, allowing for the soft transitions between lighter and darker colors. Opt for a brush with soft, rounded bristles that can diffuse color without harsh lines. A medium-sized flat shader brush is indispensable for packing color onto the eyelid, particularly when using cream or shimmer shadows. Similarly, a pointed pencil brush is perfect for detailed work, such as applying shadow to the lower lash line or adding definition to the crease area.
Brush Care and Maintenance
The longevity of your smokey eye tools depends on proper care. Regularly cleaning your brushes not only prevents product buildup but also ensures that colors blend as intended. Use a gentle brush cleanser or a mixture of mild soap and water, and never forget to reshape your brushes after washing to retain their form. An investment in a good quality brush cleanser can prolong the life of your brushes and maintain their performance.
Additional Tools for Precision
In addition to brushes, consider incorporating complementary tools to amplify your smokey eye look. A good-quality eyelash curler can set the stage for drama, lifting and curling lashes for added dimension. Additionally, the use of beauty sponges can help to apply foundation or concealer around the eyes, ensuring that your smokey eye pops against flawless skin. Remember, the right tools not only make the application process more enjoyable; they also increase your chances of achieving a professional-grade finish at home.
By equipping yourself with the right tools and taking good care of them, you can elevate your smokey eye makeup game from basic to breathtaking, allowing your creativity and skills to shine through.
Frequently Asked Questions
Q: What are the essential products for creating a smokey eye makeup look?
A: To create a smokey eye, you’ll need a good eyeshadow palette with both matte and shimmer shades, an eyeshadow primer, eyeliner (gel or pencil), and mascara. Additionally, blending brushes and a flat brush for application will help achieve the desired look. Explore the section on “Choosing the Right Products for a Smokey Eye Look” for more details.
Q: How do I choose the right eyeshadow colors for my skin tone when doing a smokey eye?
A: For a smokey eye, select eyeshadow shades that complement your skin tone. Fair skin looks great with soft grays and taupes, medium skin suits browns and bronzes, while deeper skin tones can rock rich blacks and bold jewel tones. Refer to “Choosing the Right Products for a Smokey Eye Look” for guidance on color selection.
Q: Can I achieve a smokey eye look without using dark eyeshadow?
A: Yes, you can create a softer smokey eye using neutral shades like taupe or mauve, concluding with a hint of shimmer on the lid. This technique gives a smoldering effect without the intensity of darker colors. Check out the “Step-by-Step Guide to Create the Perfect Smokey Eye” for more tips.
Q: How do I apply eyeliner for a smokey eye?
A: To apply eyeliner for a smokey eye, start by applying a dark pencil or gel eyeliner along your upper lash line. Smudge it with a brush to blend it into the eyeshadow for a seamless look. Discover more in the section on “Enhancing Your Smokey Eye with Eyeliner and Mascara.”
Q: What are common mistakes to avoid when doing a smokey eye?
A: Common mistakes include using too much product, not blending thoroughly, and neglecting to use a primer. Always start with less product and build up your look gradually. Avoid these issues by referring to “Common Mistakes to Avoid When Applying Smokey Eye Makeup.”
Q: How can I make my smokey eye last throughout the day?
A: To ensure your smokey eye lasts, start with an eyeshadow primer, use long-wearing eyeliner, and finish with a setting spray. Check “Expert Techniques for Long-Lasting Smokey Eye Makeup” for further recommendations on maintaining your look.
Q: What lip color pairs well with a dramatic smokey eye?
A: When wearing a dramatic smokey eye, opt for nude or soft pink lip colors to balance the look. Alternatively, for a bolder statement, a classic red works beautifully. See “Accessorizing Your Smokey Eye with the Right Lip Color” for more pairing advice.
Q: How do I transition my smokey eye look from day to night?
A: To transition from day to night, intensify the eyeshadows by adding more depth and using a darker eyeliner. You can also add some shimmer or sparkle to elevate the look. Refer to “How to Transition Your Smokey Eye from Day to Night” for specific strategies.
In Summary
Now that you’ve mastered the art of the smokey eye in just seven easy steps, it’s time to put your new skills into action and dazzle everyone with your dramatic look! Remember, practice makes perfect, and experimenting with different shades and techniques will only enhance your style. Don’t forget to check out our related tutorials on flawless makeup application techniques and must-have products like Seint and Thrive to elevate your beauty game further.
If you loved this tutorial, consider signing up for our newsletter for more beauty tips and exclusive deals on top-rated makeup products. Share your smokey eye creations in the comments below – we’d love to see your interpretations and get inspired by your creativity! Keep exploring our site for additional beauty content, including product reviews and essential tools for achieving salon-quality results at home. Let’s keep the beauty journey going!